
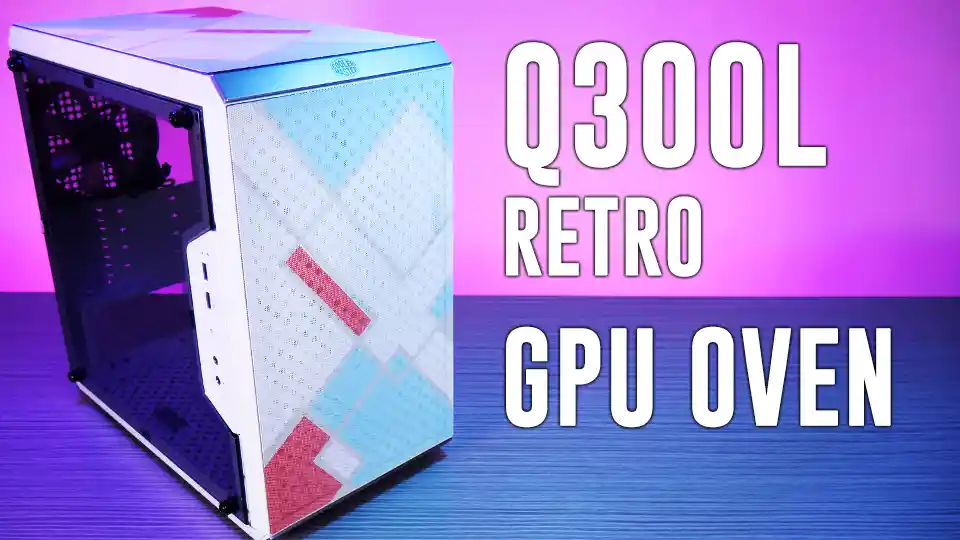
Welcome back to Techspin, where we love building PCs, but today with a very challenging Micro-ATX build in the Cooler Master Q300L Retro. While the original version released March 2018, this white Mondrian(?) art piece was released with obvious maximum effort in November 2021.
While Cooler Master delivers excellent cases like the H500, the TD500 Mesh and more, it can make some poor cases too- and this case front and top is over 80% blocked by metal,. So let’s see if we can save this Q300L Retro from the scrapheap with some upgrades, or if it’s only suitable for casual office work. I’ll tell you what is suitable for your cooling needs, and that’s our sponsor, Noctua.
From sponsored links and as an Amazon Associate, we earn from qualifying purchases. Learn more
Sponsor- Please use our affiliate link for Noctua Redux Fans at
AmazonUS: https://amzn.to/3gV0dnk AmazonUK: https://amzn.to/3xHz0KK
AmazonCA: https://amzn.to/3tbOrHC AmazonIN: https://amzn.to/33aFu6Z
Cooler Master Q300L Retro: M-ATX Easy Bake Oven
Just a quick reminder, if this video helps you, please hit that like and subscribe, give us a quick follow on social media, and if you have questions or find some tech for us to check out, leave your comments down below. Any updates for this video will be on the techspinreview.com companion post.

Quick Summary: Cooler Master Q300L Retro
Here’s the quick summary- this Cooler Master Q300L Retro gets points for the art piece appeal, and we really like the look, but not the cooling of this boxed-in oven. Cooler Master improved airflow inside the 2018 version by changing… not a darn thing, like opening up the front and top panels for better airflow.
Only front support for AIO mounting limits to a 300 millimeter long GPU. With front fans 315 is possible, and we tried a 3070 Suprim at 335 millimeters and it was a nightmare, requiring PSU and front fan removal, nearly damaging the card, and once installed, the GPU attempted to bake itself to death. The large side flanges leave just a 300 millimeter opening for installing a GPU.
The movable side I/O was always in the way during install, and the bend-to-remove solid PCI slot covers are lazy, and the first build step is their complete removal, as you can’t detach them with a motherboard installed. The difficult to remove solid slot covers also create an oven effect in the cramped zone between the graphics card and the power supply.
There are some good points about the case like the wide top motherboard wiring pass-through, but forget about top mounting an AIO, that’s not supported. And with an all white case, Cooler Master threw in a mismatched black fan at the rear for exhaust- I mean, you guys do make white fans, right? Someone dropped the ball on this one. We made it work, but the Q300L Retro is not a case we can recommend.

Q300L Retro Features & Specs
The Q300L Retro is a new white version available in some markets for around 70 bucks US, using the same tooling as the initial release in 2018, with no evident updates to address the initial reviews which centered around the need for better airflow.
Cooler Master Q300L Retro
$70 USD £55 GBP
$65 CAD €58 EUR(FRA)
$70 AUS ¥6200 JPN
$1700 NTD ₹4,000 INR
Please use our affiliate links for the Q300L at
AmazonUS: https://amzn.to/39Ac0WJ AmazonUK: https://amzn.to/3OlwhhJ
AmazonCA: https://amzn.to/3tEEaql AmazonIN: https://amzn.to/3OlAFgn
Handling Micro-ATX or M-ATX and Mini-ITX boards, the unique single folded aluminum panel approach to the case design introduces an extra 15 millimeters to the side flanges, and the narrow 300mm side opening dictates the GPU length. Max GPU length is 300 with an AIO, 315 with fans, though we got in a 335 long 3070 Suprim by removing the PSU and rotating the card 45 degrees. Good news is the case will fit a Hyper212 cooler, just barely.
The Q300L Retro measures 387 long by 230 wide and 381 high, and weighs in at about 3.7 kilograms or a hair over 8 pounds, and a screw bag with zip-ties is included. If you’re used to ATX motherboards, be careful as the bottom center M-ATX hole is sometimes down one position from the leftmost hole, it may not be at the same height as on ATX boards.
Cooler Master Q300L Retro
387mm long / 15.2″
230mm wide / 9.0″
381mm high / 15.0″
3.7 kg / 8.1 lbs
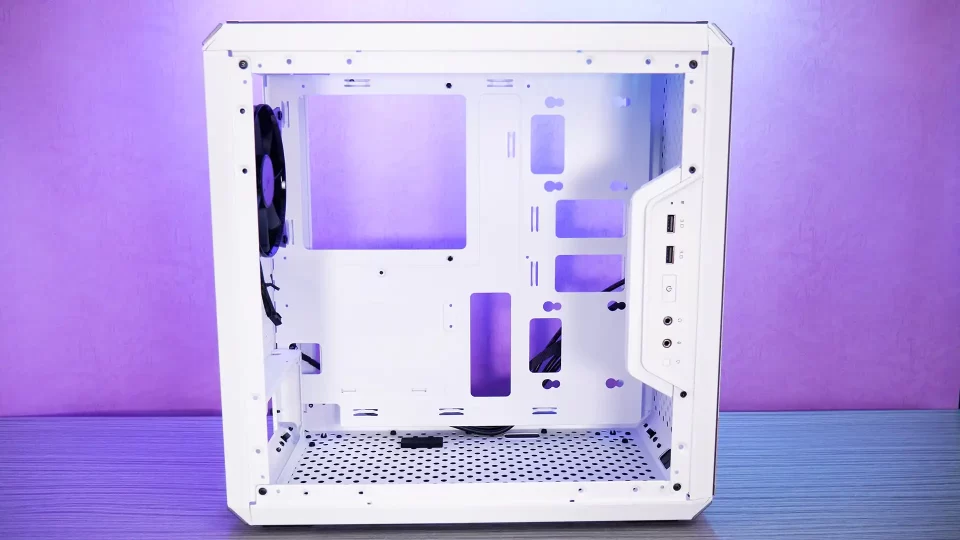
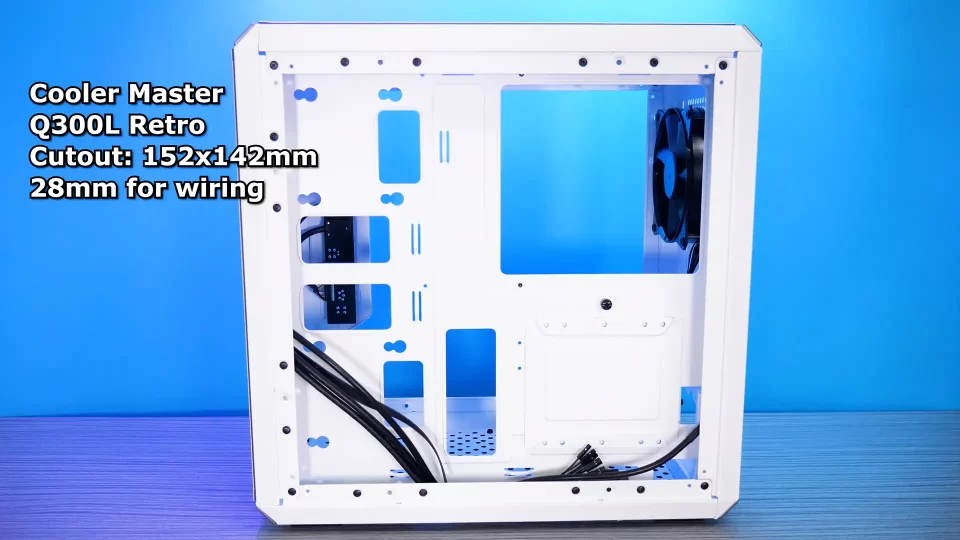
There’s two mounting areas for a single hard drive or two SSDs, Motherboard tray cutout is 152 wide by 142 high, and side panel clearance is 28 millimeters for wiring which is something done right with this case. The front takes dual 120 or 140 fans and has the only spot for a 240/280 radiator, though the 140 mil holes space the fans 10 apart, so only 4 screws to hold on a 280 rad. The top can only handle 2x 120mm fans, no AIO here. For the rear 120, Cooler Master DGAF and threw in a mismatched black fan here, ‘cause hey! No one is buying this for looks.
Cooler Master Q300L Retro
Front: 2x 120/140mm AIO
Top: 2x 120mm fans
Rear: 1x 120mm fan (AIO)
The Q300L Retro’s top and front art filters are magnetic, but the problem is the metal underneath covers over 80% of the surface, and these filters will further reduce intake and exhaust. Can you actually believe this… excellent thermal performance! (Rocket laugh)
So the rear panel has the black airflow type 120 mil fan along with 1.5 centimeters of travel, with 4 lazy stamped slot covers which should all be immediately removed before you install the motherboard, you have been warned!
The easily scratched acrylic side has a cutout for the front I/O with dual USB 3.0 ports, but no USB-C, because it’s a 2018 refresh with maximum effort. This I/O panel COULD be mounted to a different area, left, the upgraded fan blocks it… the top, not really enough clearance with fans for the thick USB wiring, or bottom, yeah maybe. Two front panel and two side panel screws attach the I/O, just remove it completely until the end, as we reinstalled this panel 10 times.
On the bottom there’s rubber feet, and the filter is held on by rubber plugs that come off fairly easily. The case is also designed to lie on its right side as the panel screws also have rubber feet.
So build tips: Install the motherboard standoffs and make sure they match the motherboard holes, remove all rear slot covers, remove the front I/O completely until the end of the build. Put in the motherboard, plug in the top ATX 8 pin wiring, CPU cooler and any top fans, then GPU, DDR4, PSU then reattach the front I/O in that order.
Testing: Cooler Master Q300L Retro
So for the Q300L Retro we’re gonna run this case stock first, with a Hyper 212X cooler with a single fan. Second test we used one Noctua NF-F12 and two NF-A14’s, and we ran each test over 10 minutes. Our test-bed is an MSI B660 Mortar WIFI DDR4 with an i5-12600K, a temporary RTX 3070 Suprim at 335 millimeters long. All tests were run with the remaining two solid PCI covers still on.
So at a 24.5°C ambient temperature, with just the stock single fan, we’re at 32°C at idle, 68°C at CPU load, and 73.1°C GPU load with CPU at 49°C no load. This is just the CPU handling the Furmark bench and heating up as the case internals heat up, not promising. The 5 minute cool down shows the CPU at 38°C and the GPU taking a long time to get back to ambient, still up at 37.4°C with zero load, as the long GPU splits the interior in two. This case can’t dump heat well under the GPU area due to the solid PCI slot covers, and nearly solid front panel.
Next we’re running the standardized test with static pressure Noctua fans, at idle we’re sitting at 32°C for the CPU and 33.2°C for the GPU, running Furmark we see 63°C max on the CPU under load. The 335 millimeter GPU actually performed worse under load at 74.3°C running Furmark, we believe from negative pressure being better due to its closed off panels. However the cool down was better at 34°C CPU and 35.3°C for GPU temps.
The top of the Q300L Retro does NOT support AIOs, but we planned for a 240 AIO here, and tried to make it work. But there’s no room, the single DDR4 ram stick had zero clearance in the dual top fan corner gap, the AIO fans were pushing it out of contact with the slot pins. For front fans we tried two Arctic 140 PWM fans up front with 2.4 mmH20 pressure.
But we had to remove the GPU to get the AIO in up top, almost damaging it. Running the Furmark CPU stress test, hitting a stable 67°C, one degree shy of stock and 4 degrees worse than standardized. The blocked case top is not allowing air to escape and is recirculating the hot air. However the CPU hit a frosty 26°C at idle, so we know the AIO cooler is operating properly. We’ll need to dedicate a shorter graphics card to future case reviews.
We tried the edge-most top panel holes for the AIO, but the case is too narrow and the AIO fans are vibrating the wedged in DDR4 stick, so this won’t be reliable. So the final build has reversed airflow, with a push on the AIO out the front of the case, and three SickleFlow reversed pulling air in from the back and top. We ran out of time for testing temps unfortunately, but it shouldn’t be an improvement as the top 120 fans are outperformed by the static pressure 140mm fans we had planned.
Please take a moment to hit like, get subscribed, and click the bell, it supports us making new episodes, and you’ll get notified when we release new videos.
Q300L Retro: Art appeal but a GPU Oven
I’ll start by saying, we really like the design of the Cooler Master Q300L Retro. Any time you can bring something unique to the market, we’re all in. However the lack of attention to detail becomes apparent when you start your build. The biggest problem is with the extra interior flange which cuts down accessibility, and none of the case sides are removable. This build would have been much easier if the front came off, and it also would have solved a lot of fitting issues.
The old school bend-off stamped slot covers caused us to remove the motherboard twice, once to remove a couple for the GPU, and a second time for the rest, to get some airflow under the GPU. Trying to fit static pressure 140mm fans in the front required back panel removal to adjust the I/O wiring, as we had to fit the wiring between the 1 centimeter fan gap and the long GPU, and the front I/O was constantly in the way.
As an office machine, the Q300L Retro shouldn’t overheat. With an i9-12900K you’ll hit higher temps, but for a i5-12600K maxing out at 68°C degrees, is this a big deal? The real issue comes with gaming, where new long GPUs dump all that heat directly into the confined space, and the case couldn’t deliver enough fresh air to cool the GPU.
Building in an M-ATX case, you need to check where you can place an AIO, and work harder to fit in big components, but with the Q300L Retro, this is unnecessarily hard. Cooler Master, you do make great cases, check our link top right to the playlist for the H500 and the TD500 mesh, and we really like the exterior design of this one, but with the chance to make this better, you failed.

To fix this case, Cooler Master should have cut out huge front and top sections for fans, with a removable top or ideally, front panel. Going for an all white art appeal? Use a white fan. The side I/O needs USB-C. And ditch the old style bend-off slot covers, which require you to take out the motherboard, which we had to do twice. This is the longest I’ve spent on a build in 5 years, including unusual and reversed cases, and that’s unfortunately from poor case design.
We’re looking at other Mini-towers from Cooler Master and there’s the Silencio S400 and TD300 mesh, that Sakura edition looks pretty nice, and I’m sure the Mesh will really have excellent thermal performance, but neither has a full side window, but we may check one of these out soon. If you do decide to pick one of these up, shopping through our affiliate links below will help us here with no extra cost to you. And follow us on Twitter, Instagram and Facebook at techspinreview.
And a big thanks to Noctua for being our sponsor this episode, we’re using their high static pressure fans to cool the hard drives in our Fractal Define R5 NAS build, and they’re perfect for cooling your rig.
What’s the best PC case you’ve had, or which one are you looking at now? Join the discussion in the comments. I’m thinking we should look at some Fractal Design cases in a bit. And we’re interested to hear what you want to see reviewed. Please take a second to hit Like, subscribe, the bell, and we read and reply to a lot of comments so if you have a question or if we missed something, please tell us down below. We really appreciate you watching this far, thanks for your time, and we’ll see you on the next. Bye for now.
See more Cooler Master, Monitor, PC case reviews