UPDATE 10/10/2021: You may need to convert your current system drive, if it’s MBR, to GPT. Try updating BIOS to the latest. If you still have issues, then try a fresh windows install to a spare drive.
With the release of Windows 11, Microsoft is stepping up protection for your PC in today’s online and work from home world, making securing your PC a necessity. Two of the requirements for PCs to install Windows 11 are that both TPM and Secure Boot must be enabled in your system. Today we’ll look at both settings in BIOS that may need to be enabled, and it’s a cool breeze if you follow our guide.
We’ll be doing this with an MSI B550 Tomahawk which is an AMD board, and we also tested with an Intel z390 Tomahawk, b360 Gaming Arctic and an older z270 XPower Gaming and this works with all these models. By the way, don’t forget to give us a quick follow on social media, and subscribe and bell, all that good stuff, and if you tried your own upgrade or have questions, leave your comments down below.
Enable Secure Boot & TPM for Windows 11: BIOS How To Guide!
So it’s quick and easy to do this in BIOS with a few steps, as well as give you some troubleshooting tips, when you’re ready to get Windows 11. If you’re doing this now, having another device like a laptop or phone with this video will make following this walk through nice and easy.
From sponsored links and as an Amazon Associate, we earn from qualifying purchases. Learn more
Sponsor- Please use our affiliate link for Noctua Redux Fans at
AmazonUS: https://amzn.to/3gV0dnk AmazonUK: https://amzn.to/3xHz0KK
AmazonCA: https://amzn.to/3tbOrHC AmazonIN: https://amzn.to/33aFu6Z
Why do we need to enable Secure Boot?
So why does Windows 11 need this extra security? Quickly, Secure Boot is part of UEFI, which is the newer interface between your BIOS and your OS. Secure boot resists infection from malware, including boot loaders. The older type is CSM, and that’s why we’ll change the OS interface to UEFI first.
The Trusted Platform Module or TPM are embedded chips on most motherboards and enterprise grade notebooks, and they secure hardware with keys. If you bought a PC after 2016, it should have TPM 2.0, but if it’s older it may have TPM 1.2 or maybe no TPM at all.

Before we enable Secure Boot, set UEFI
So tapping Delete to get into BIOS, we’ll go to Advanced mode by pressing F7. In Settings, go to Advanced, then Windows OS Configuration. Check to make sure the BIOS mode is set to UEFI. If it’s not, you’ll need to change this to UEFI first, then hit F10 to Save and exit. In slightly older BIOS versions, this may be listed as Windows 10 WHQL Support, and older boards may have a Windows 8.1/10 WHQL Support line, which we’ll enable.

At this point, it’s important to hit F10 to Save and restart, and tap Delete to get back into BIOS. If you try to install the Secure Boot keys before doing this, the end dialog is to Reset without saving, which will put you in a loop where Windows 10 OS still has CSM selected, and it’ll block your enabling of Secure Boot. So save and restart first.
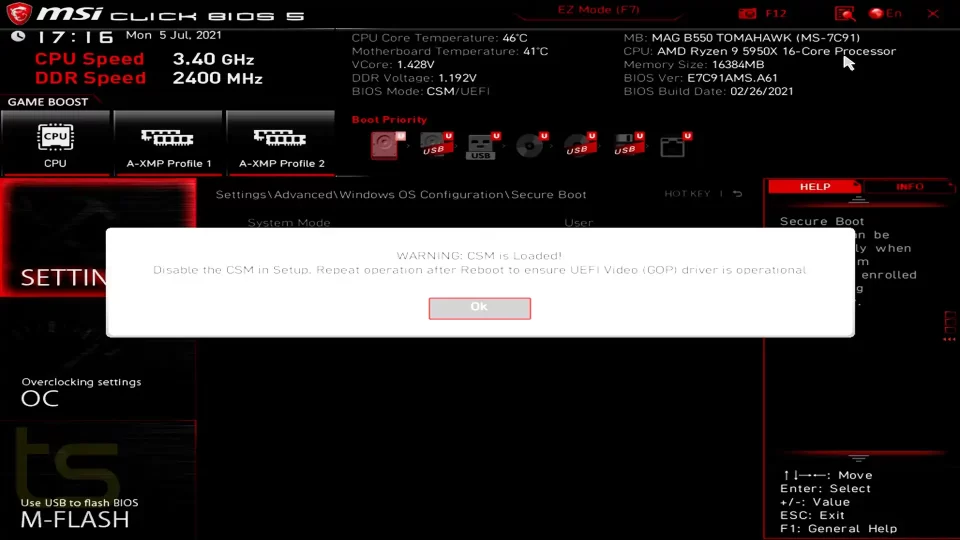
Also, when you change CSM to UEFI, your computer may restart a few times or beep a few times and not POST. If you wait 30 seconds without anything happening on screen, just turn off your power supply, wait 10 seconds, turn it back on and hit power and start tapping Delete again. By the way, if you miss tapping Delete and go into Windows, holding Alt and pressing F4 a couple of times will give you the Shut Down box, press the down arrow to select restart, hit enter, and start tapping Delete again to get into BIOS.

From sponsored links and as an Amazon Associate, we earn from qualifying purchases. Learn more
Please use our affiliate links for Intel CPUs at
AmazonUS: https://amzn.to/3HJmwK7 AmazonUK: https://amzn.to/3WaMkmP
AmazonCA: https://amzn.to/3V9k6Y0 AmazonIN: https://amzn.to/3j8h0X3
Install factory keys and enable Secure Boot
Now we’ve restarted using UEFI, we’ll go to Settings…Advanced…Windows OS Config, and down to Secure Boot and hit enter, and we’ll install the keys first. Going to Secure Boot Mode, we’ll change from Standard to Custom, then the options below will turn active. We’ll choose Enroll all Factory Default Keys. The first dialog confirms Installing Factory default keys, and the second will ask to reset without saving. You can click No, but you may need to Save and exit if you have any issues with the next step.
Now we’ve installed the keys we can select Secure Boot and choose Enabled.
Enable TPM and see BIOS status
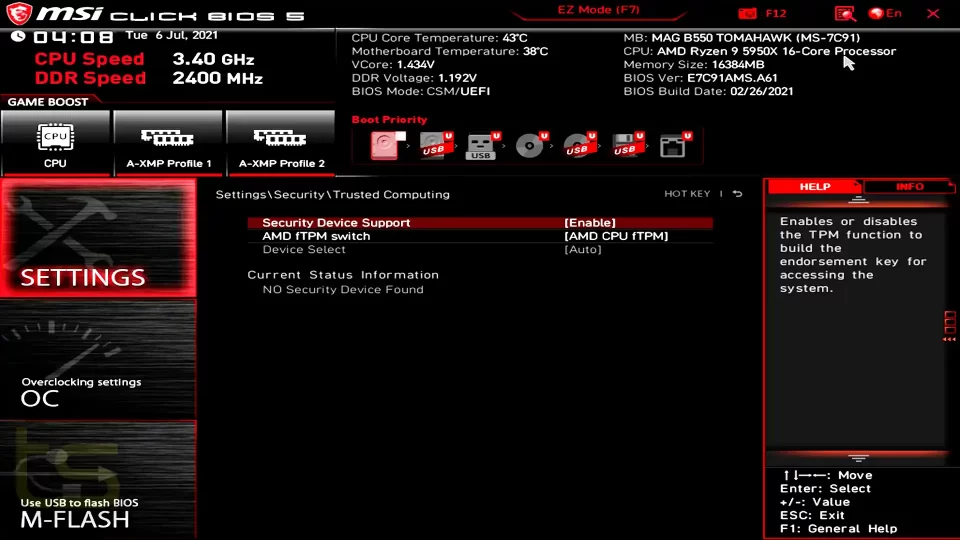
Pressing the Escape key a few times will get us back to the main Settings menu, and now we’ll select Security… and then Trusted Computing, then we’ll put Security Device Support to Enabled. We won’t see an update in Status Information until we hit F10 to Save Config and exit, which we’ll do now.
If you want to verify what you’ve done, to see the new Status Information, tap Delete into BIOS, and going back to Settings… Security… Trusted Computing, you should be able to see the Status Information listing TPM 2.0 as being active.

Windows check: Enable Secure Boot worked?
We’ll boot up into Windows, and we can check if TPM is working, click on search and type in tpm.msc and hit Enter. The status will say ready for use, and in the middle column, if you scroll right it will give the Specification Version which is 2.0.
So how do you see if Secure Boot is working in Windows? Just click search and type “msinfo” and hit Enter, and halfway down the list you’ll see Secure Boot State and this should say On.
You can see if you’re ready for Windows 11, in search or your browser, with “Upgrade to the New Windows 11 OS”. If you hit Ctrl+F to find, start typing in Download and then click Download App. Run it, accept, install, and then Finish. Microsoft is working on or has pulled this PC Health Check at the time of production, but we clicked Check Now, and got a green tick.
With Secure Boot and TPM enabled you should be ready for Windows 11. That PC Health Check tool did give false negatives, and really did nothing to tell you what you need to fix, so hope Microsoft has a better version out soon. Don’t forget PCs older than 5 years or laptops lacking TPM 2.0 may have issues trying to upgrade to Windows 11.
From sponsored links and as an Amazon Associate, we earn from qualifying purchases. Learn more
Please use our affiliate links for AMD CPUs at
AmazonUS: https://amzn.to/3HIVSRp AmazonUK: https://amzn.to/3WvTP7k
AmazonCA: https://amzn.to/3HLVEJd AmazonIN: https://amzn.to/3hyVLgP
So that wasn’t too hard, and hopefully this helped you get secured and ready, and if you’re thinking about an AMD or other motherboard, shopping through our affiliate links will help us here with no extra cost to you. And follow us on Twitter, Instagram and Facebook at techspinreview.

We have tech reviews on the channel so be sure to check those out too, and thanks to Noctua for being our sponsor this episode, with an extensive lineup of high static pressure fans perfect for cooling your rig, check them at the links above.
We’re interested to hear what you want to see reviewed, let us know and we’ll try and get to it. And leave your best episode opening lines and we might just pick yours next time. Please take a second to hit Like, subscribe, the bell, and let us know how we can improve. We read and reply to a lot of comments so if you have a question or if we missed something, please tell us down below. We really appreciate your time, and we’ll see you on the next. Bye for now!
See more MSI product, Tech reviews or Guides