
Hey everyone, I’m Rick with Techspin and we’ve been hard at work behind the scenes here, with a how to paint a PC guide for the nice case that Enermax sent us! Between Enermax and MSI, consumers can actually achieve a fully white PC build, so I thought, let’s go for it and see what can be done with the right components.
First we’ll talk about hot to paint a pc, then we’ll get onto how to build a PC. So to prep the case I had to remove the front and top, and take out the grill from inside the top, and the metal panel covering it. For the front I removed all the wiring, grills from both sides and unscrewed all the buttons, and carefully remove the case logo.
From sponsored links and as an Amazon Associate, we earn from qualifying purchases. Learn more
How to Paint a PC / How to Build a PC- please use our affiliate links on
AmazonUS: https://amzn.to/2MufF9y AmazonUK: https://amzn.to/3dx0HLR
AmazonCA: https://amzn.to/2BwMsbQ AmazonIN: https://amzn.to/35bnk6y
How to Paint a PC- custom design
And remove all the buttons from the case front. It was originally black, but I used a coat of gray first and let it dry. Here (in the video) you can see just one coat of white over the gray, and I don’t cover everything in one coat. White tends to take longer than other colors to dry, up to 20 minutes or more depending on temperature and humidity.
If you put down too much paint at once, your paint will run which is a huge pain to fix. You’ll need to clean all off or sand it off and redo it. The main case had just one coat of gray with a touch-up coat, and I gotta say, it looked really nice already like this. I almost wanted to stop the white PC build and try a silver one!
The gray dried quickly and was super easy to work with, and I did all sides and angles, which takes some time to dry in-between. I left the bottom for last and did the sides first, so I could lean the case back. And if you want to try this, you’ll need a well ventilated area, and use a mask, even a medical one will help to keep paint out of your nose.
Hangers are great for painting smaller pieces, you can get the front and back easily, just careful the hanger doesn’t scratch the paint. The gray case is all ready to go, make sure you paper the area. I’ve used newspaper before but construction paper works much better. This is the second time I’m doing a custom white PC build, and white spray paint is difficult to work with, since it shows the color underneath. Don’t spray white over black, as it takes 5 to 6 coats of paint to make it look really white.

Using gray or gray primer first, the result is much easier to achieve with just two coats of white after the grey fully dries, with minimal touch-up. The grey coat dries fast, too, about 10 minutes and it was ready. You can check by touching a not-important surface very softly, you can see if the paint is tacky or dry. You shouldn’t move freshly sprayed pieces, but even after it dries, be super careful moving them or you get smudges, which are hard to fix.
Since the paint is already dry on this piece, I’m using 600 grit wet sandpaper to gently grind down the corner so it’s flat. Ideally I’d be using some power tools but this has to get finished asap. Time and patience, and be careful with the sandpaper. If you have OCD, painting cases is probably not for you.
For me I want to do the best paint job possible, and if I do that, I call it finished. Off camera I’m running my thumb over the spot, it should be perfectly flush if done right. I’ll rinse to clean the area. This turned out okay but I still feel some small power sander tools would have worked better. Anyways, it’s the best I can do, so it’s time to move forward.
Using newer cloth towels to softly pat the surface first and a hair dryer you can get the piece ready to be painted again quickly, but it has to be bone dry. Clean, newer hand towels are better as you don’t want lint on your surface you’re gonna paint. Also, heating up the surface, the paint will become tacky again so don’t touch or bump it.
Okay, this took about two days time, one full day on Sunday pretty much with work stoppages for real life things like sleep, work and getting food. This was so much easier using a gray coat first, and wow, the end result is really stunning. Now my actual install is happening Friday, as there’s a difference between dried paint, and cured paint, which takes 3 to 7 days.

How to Build a PC
Inside the case it turned out really well, I did have a problem spot but from most angles you can’t really see it. I’ve already put the motherboard standoffs back in carefully. The front, back and side turned out well too, I think. I’m not worried about a perfect job inside the power supply and hard drive area as it won’t be visible, but I did get some white in there.
I will use a towel for all my work on the case, as the paint is still fairly new and can easily scratch or chip, so I’m not going to scratch it on the desk, and take care as you put hardware in. That ends our How to Paint a PC section, Time for How to build a PC!
Installing the CPU
We’re using an Intel i3-8100 for the build. Always ground yourself by touching metal surfaces before and during working on your computer. To install, first we’ll release the cover using the lever. Then lift the cover.
Align the notches at the top with the socket and place it down. The CPU text will be facing UP as you look at the board upright. Wiggle slightly to make sure it’s properly in the socket. Next lower the cover and make sure it fits under the holding screw at the bottom. Push the lever down and the top will pop up. Putting the lever in will take more force than before. Save the socket cover in case you need to return or sell the board!
If you’re using an Intel cooler then it can be a little tricky to get the tabs locked in properly, but you can do it with a bit of patience. The cooler won’t be loose if you’ve done it right.
Installing the CPU cooler
We cover installation of the Enermax ETS-T50 in a previous video. Their new version now has an ARGB fan. The five copper pipes come down to the contact plate for the CPU, which has plastic we’ll remove to install the cooler. First, attach the backplate. I’ll be choosing the middle of these three spots which is the mounting position for LGA 11-50 X sockets. The plate reads “this side for Intel” we’ll use for the MSI B360 Gaming Arctic board.
I’m inserting the bolt and making sure it’s completely flush, you may have to turn it a bit to get it aligned properly. Then slide on the plastic shroud which keeps the bolt in place and makes for an easier installation process. And repeating this for the remaining 3 bolts.
Finished, I’ll put the bracket on the back of the Gaming Arctic. Note the AMD legs we aren’t using are raised up and away from the board, so it doesn’t short out and kill your shiny new hardware. Time to attach the top plates and cooler.

First, the spacers slide down the bolts. Next the Intel plates go down. They will also use the middle slot to match our choice earlier. Nuts go on the top to lock down the top mounting plates. The CPU already has some grease applied from my test fitting in the morning. Put down two thin lines to form an ‘X’ for the thermal paste on the top of the CPU.
Undoing the clips is easy, as we remove the front fan and back shroud from the cooler. The front of the mounting plate is easy to get to as the cooler is positioned off center towards the back.
Enermax supplied a hefty amount of cooling compound, you should use a couple of grains of rice sized dollops on the top of the CPU. You can use the spreader to help cover the top, though the cooler pressing down will spread the compound evenly.
So the cooler female bolts sit on the male bolts coming up from the middle of the plates. Everything looking good so far, I’m just tightening it down halfway. Installed, it’s time for the back shroud to go on, which is very easy. And the front fan is last, it just clips right on. Let’s continue with how to build a PC.
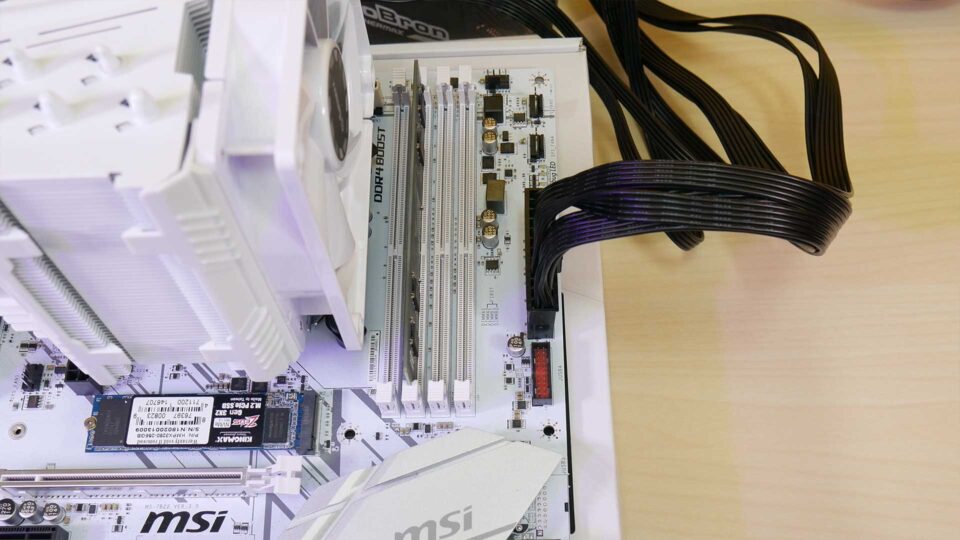
Installing the DDR4 RAM
We picked up Kingmax stick of DDR4 8 gig 2400 memory for 78 bucks and a Kingmax m.2 NVMe Gen3 256 gig SSD with 1600 meg read and 850 meg write speeds for 65 dollars. Not the fastest, but over 3 times as fast as a regular SSD.
For the fastest you can choose an AData SX8200 240 gig with 3200 meg write and 1100 read speed for 100 bucks, or the king, the Samsung 970 Evo 250 gig with 3400 read and 1500 write speeds for 110 dollars, or the double capacity 500 gig with 3400 read speed and an improved 2300 write speed for 230 bucks.
Always check the module installation guide in your motherboard’s manual to get the best performance and the least issues. Here it says to install just one module in slot 2. Tab out the clips. Some motherboards the bottom clip won’t move, just FYI. Line up the notch… and press down firmly to install.
Installing the NVMe drive
Installing an m.2 drive is easy. First we test fit the drive. The standoff to the left is too far away, so we need to move it to the correct position. The printed label will usually be facing you. Wiggle in the m.2 at a 45 degree angle, should be pretty easy. Carefully press down. Inside this motherboards accessories in a single plastic bag is a special screw. Don’t lose it! And we’ll secure the m.2 drive. All done.
Installing the main power, test
Next connect up the ATX 24 pin and make sure the hook gets fully over the tab, so it’s locked in place for testing. To remove, press on the back of the tab so it clears. Then wiggle the connector up and off.
Finally, switch the Power supply on. It’s possible to turn on the motherboard by connecting the power switch leads with a screwdriver.
The power leads are the two I’m pointing out here, they match the legend to the right, or in your motherboard manual. Be super careful not to touch any other components or you’ll fry your board!
You should always test your setup before installing it into the case. So that’s installing the CPU, the CPU cooler, memory, an m.2 or SATA SSD for windows and motherboard power. Test with onboard graphics first before using any graphics cards. Always disconnect power and wait 10 seconds before adding or removing hardware.
Test outside first, Install I/O shield
Standoffs in and checked they match all the holes in the board, first we install the I/O cover. Next is the motherboard, and checking that we have clearance for the ATX 8-pin, we’ll put in all the screws.
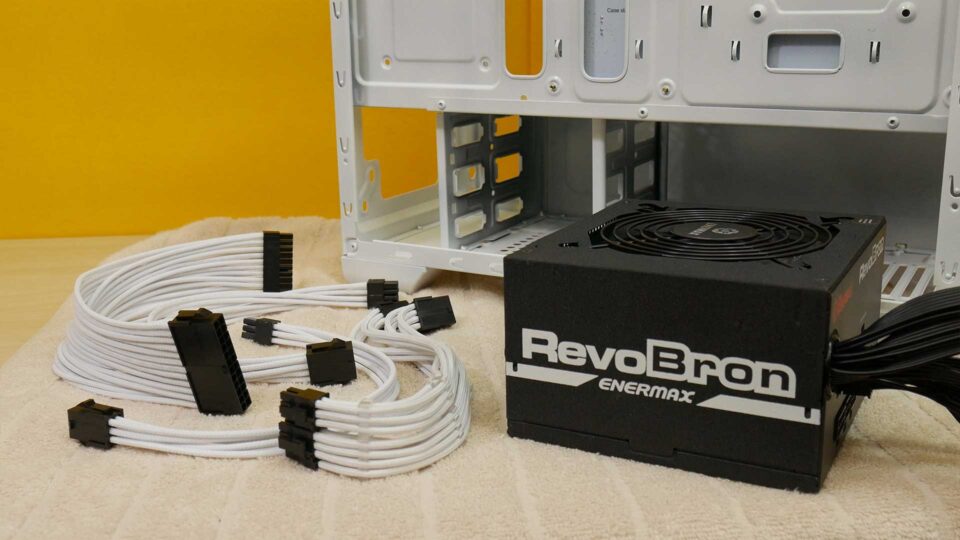
Since we’re doing a custom build I’ve pre-ordered Silverstone custom white cables to match. The cable combs I believe were from CableMod…? First the Enermax RevoBron 700 watt power supply will go in, and I’m attaching it with screws on the back.
Next the ATX 8-pin power goes in, then the 24pin main power onto the board. I like to do the 8-pin first as occasionally you’ll have issues with some cases, but not this one.
Next we’ll move on to the top case fans, which install easily. Snapping the top panel of this case back into place is easy, and needs to come first before the front panel. Other cases may have a different panel assembly method.
And before we do the case connectors, we should sort out those front fans which I’ll install here. These are Cluster Advance white 120 millimeter fans which were kindly all sponsored by Enermax, so in go the first three.
We’re finished with the front so we can carefully put it on. Try to put the panels on just once to minimize damaging the new paint. And then we’ll need to hook up the front panel connectors, I find working left to right is a bit easier being right handed. Power and Hard drive light are on, then the power switch and reset switch.
The RevoBron 700 watt comes with this Coolergenie unit, which connects in-between the CPU cooler and the CPU fan port. This way it detects your BIOS fan setting, on Whisper mode below 40% the fans don’t spin. On Silence mode below 55% the fans are off. And on OFF mode the fans spin according to the BIOS setting.
Anyways I’ll hook up the front three fans to it. It has a Velcro or magnetic strip option which we’ll use to lightly secure it inside the case. If you have more fans than motherboard headers and don’t have a Coolergenie you can always pick up a PWM Fan Hub, with either 4 or 8 fan capable variants.
Make sure fans are on PWM mode in BIOS
With any fans or fan hubs you hook up, you’ll need to go into the BIOS and set all your System fans to PWM, as most motherboards default will be DC mode, so they’ll run loudly at full speed and LEDs may not show full brightness. This way you’ll get quieter and bright LED case fans. Attach cables onto the SYStem fan ports on the motherboard.
Make sure your front panel USB 3, USB 2 and audio connectors are all connected up to the motherboard first. Then it’s time to connect the bottom two case fans. And position and thread the screws into the fans on the power supply cover. Use a screwdriver to finish. Simple enough.
If you have SSDs or hard drives, now is the time to hook those up too. Always have the power supply turned fully off. Never connect drives with the power on otherwise you can fry your drive’s circuit board. Ask me how I know.
Anyways these Transcend SSDs have the graphic the wrong way around as the connector here is actually on the right hand side.
We had a discussion at Techspin and ultimately decided not to paint the grills black in this white PC build, as we thought they would accent the case grills and match the buttons. That ends our How to Build a PC section.

I’m pretty impressed with the end result, it turned out pretty well I think. Of course with different cases and components your results may vary, but this is mostly to give you some ideas about what you can do with just a bit of effort and time, and you too can have a custom white PC build.
I really hope you enjoyed this how to paint a PC and how to build a PC guide, it took me several weeks of planning and about a week total to paint, assemble and film everything. A big thanks go to Enermax for sponsoring the RevoBron 700 watt power supply, the ETS-T50 Axe white CPU cooler, and all the case fans, without which this would not have been possible. And if you have questions about the build, design or components please let us know in the comments and we’ll try to answer as many as we can. If you pick one up, shopping through our affiliate links will help us here with no extra cost to you. And follow us on Twitter, Instagram and Facebook at techspinreview.
Please take a second to hit Like, subscribe, the bell, and we often reply to your feedback so if you have a question, fire away. We really appreciate you watching this far, thanks for your time, and we’ll see you on the next. Bye for now.