
We do work with clients to produce content; however, we retain all rights to present accurate observations, testing, and conclusions. Consumers should have all the facts, and we’ll deliver that.
Are you tired of your old PC case? Bored with a plain front panel design?
We’ve got an exclusive case review on the MSI Gungnir 100! Thanks to a collaboration with MSI on a 5 gigahertz overclocking guide video, I had the brand new Gungnir case in the studio and was able to test it out and complete a full install in it.
MSI has just entered into the DIY case market following their MAG Pylon and MAG Bunker cases, and now the MPG Gungnir 100 will add to their selection. With cases that come through for testing, what I look for is quality construction, good filtered airflow, and ease of assembly and accessibility. And of course, is it worth your money? Let’s find out!
From sponsored links and as an Amazon Associate, we earn from qualifying purchases. Learn more
Sponsor- Please use our affiliate links for Enermax LIQFusion
AmazonUS: https://amzn.to/2UoS7FJ AmazonUK: https://amzn.to/2zINRbq
AmazonCA: https://amzn.to/2L2u0sd AmazonIN: https://amzn.to/2Lkrlyf
MSI Gungnir 100: Quick summary
This MSI MPG Gungnir 100 should be the final release version, no price yet but we’ll update the description below with the price and affiliate links when it becomes available online. The Gungnir 100 is a bold statement from MSI, with subtle RGB front accents along with the tempered glass side.
EXCLUSIVE! MSI Gungnir 100 Case Review!. Please use our affiliate links on
AmazonUS: https://amzn.to/2YQy7NR AmazonUK: https://amzn.to/2WlUrRD
AmazonCA: https://amzn.to/2HBlMr1 AmazonIN: https://amzn.to/3beswdt
There’s an ARGB fan pre-installed in the back and that’s hooked up to an 8 port RGB fan hub. The fan hub supports MSI’s Mystic Light RGB software. The full tower Gungnir measures 51 centimeters deep by 23 wide and 53 high, and handles up to 40 centimeter VGA cards and 170 mil CPU coolers.
For motherboards, the Gungnir can take E-ATX boards to 272 millimeters, ATX, M-ATX and Mini-ATX boards. It has mounts for two 3 point 5 inch hard drives or SSDs, plus space for 4 more SSDs.

Up top there’s room for a 360 mil rad, and the front intake has three black fans installed inside the front cover, which has the RGB accents at the top and bottom. The top front triangle can be replaced with your own 3D printed design which can be enhanced with the RGB lighting there.
And the Gungnir 100 has 7 spots where fans can be mounted to provide very good, filtered intake airflow.
The right side of the case is one solid piece that, like the tempered glass side, sits on the feet for easy installation. I like the venting slats up front.
Sideswipe keeps the red and black theme as we check the top panel, which has side vents to exhaust the three fan spots, ending in the front I/O panel and MSI logo.
Left to right we have a edge-lit power button, hard drive access light, two USB 3.0 connectors, HD audio ports, and the LED or Reset switch.
Removing the right side, there’s a little wiring from extra Corsair LED strips, and we can see the two removable SSD trays on the left.
At the top there’s two rubber grommets for wires, and the RGB Fan hub. MSI’s stamped cover sits next to the wide motherboard cutout for easy cooler installation. Removing the three screws on the cover, we can reveal the four Velcro cable ties which you’ll need in order to strap down the cables enough to fit them inside.
If you’re doing RGB wiring the double wiring will create a jumble if you try to fit that all in, so plan accordingly. The PSU area takes normal sized power supplies but they just barely squeeze in here, as the dual hard drive caddy sits a bit closer than necessary. The drive caddy trays are well built and slide out easily.

Gungnir 100’s construction
Removing the top of the Gungnir 100 we see the mounting spots for top mounted radiators. Specs say you can mount 240, 280 or 360 mil rads here. Our Corsair Hydro Series h115i 280 mil rad you’ll see later couldn’t reach the rear holes without blocking the 8-pin ATX wiring, so we also used a couple of lattice holes to mount it.
And on the rear is the pre-installed 120 mil ARGB fan supplied by MSI, and this spot can also take 140 mil fans. The motherboard tray area has supports for E-ATX, ATX, and smaller boards, with a really spacious interior. And the angular rubber grommet design is well done.
On top of the PSU cover there’s spots for dual SSDs with an easy thumb screw to secure the brackets on the case. And a view of the three black air intake fans which come pre-installed behind the front grill for lots of fresh air to feed your case. At the top there’s a nice cable pass-through, a good design.
Some grommets are a bit wide in the center but these ones do a good job of closing the holes in my opinion. The bottom front has room for air intake, and as we go to the back, there’s an air filter for the power supply. For cleaning, it slides out pretty easily.

Removing the front panel there’s the three 120 mil intake fans. And at the bottom is the RGB strip which illuminates the clear triangular band at the bottom of the front panel, on the right. One nice surprise is that the front panel has dual filters on either side of the intake slats. A small detail, but very appreciated.
Removal and installation of the tempered glass was easy because the feet extend out and support the glass during installation. Reassembled, we can see the RGB accent at the front top, which looks really great. This is the piece you can 3D print to customize. Lighting is controlled by the RGB hub, and you can change modes with the reset button.
The front bottom accent is synched to the top, though the not included Corsair RGB strips use a different controller, I didn’t have enough time to find a way to sync them up.
Build system parts
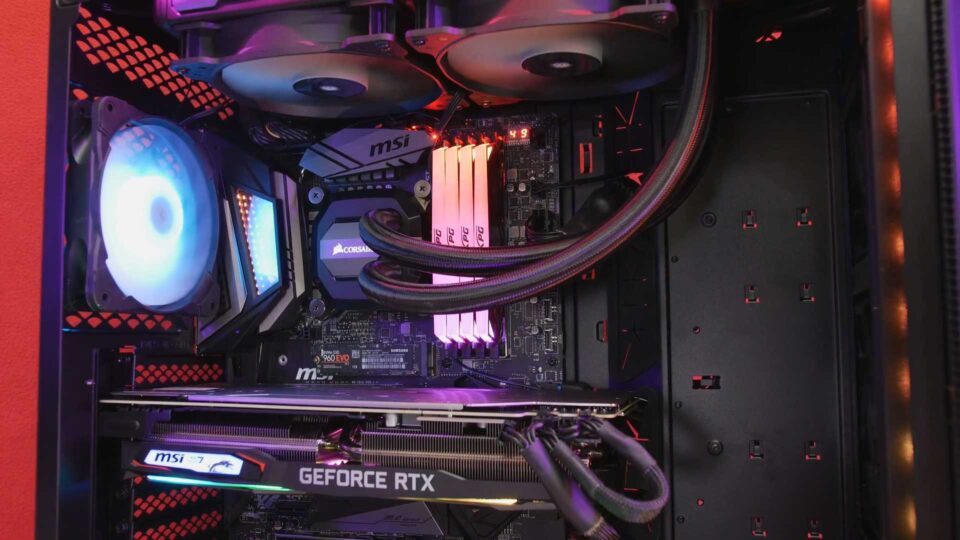
Building in this case went fairly smoothly, we used the MSI ACE z390 motherboard with our i9-9900K CPU. The ACE z390’s Infinity mirror chases on the left, complementing the 32 gigs of XPG D41 RGB DDR4 that ADATA kindly lent us for this build. System drive is a Samsung 960 EVO 1 terabyte m.2 drive, with cooling done by the Corsair h115i 280 mil rad. And graphics are handled by an MSI GeForce RTX 2070 GAMING Z 8G, with power supplied by the Corsair RM850x.
The Corsair RGB strips go around the inside lip of the case, and the magnetized backing holds them in place securely. … There’s just enough room to fit them around the whole perimeter. Nice backplate on the RTX 2070!

So, how’s the Gungnir 100??
So the MSI MPG Gungnir 100 has a good design with some nice RGB accents, going for a more subtle style, and giving a high end look. The large interior made installation easy and with good airflow with triple fan intake and exhaust possibilities, we’ll be giving it a Techspin Gold award.
Great styling, filtered air intake, USB 3 ports, case RGB accents with an RGB fan and controller that synches with Mystic Light software- this is a really great combination of features.
There are a couple of points- with power and RGB wiring hooked up, it’s tricky to put the MSI stamped metal cover back on, you’ll need patience. An extra centimeter or a pressed out square in the side panel would have made replacing the side easier.
To be improved…
A small issue I mentioned with Corsair’s h115i 280 mil rad, it can certainly mount at the top, though the ATX wiring won’t be able to fit through the grommet as it will get blocked if the rad is fully to the back. Still mounts fine using the lattice holes up top, though.
And the last thing that could use a little improvement, the space for the power supply is cramped; to access this fully modular Corsair RM850x I had to unscrew it and turn it sideways. Moving the hard drive caddy forward would make cable management much easier.
An easy solution to this would be a outside PSU mounting plate, attached to the PSU, which could slide into the case and screw on to the body. One piece of metal, easy fix.
The build in this Gungnir 100 was done in preparation for testing and overclocking to 5 gigahertz for our Overclocking to 5Ghz guide we worked on with MSI Gaming, please have a quick look at our guide which and I’ll put up the link here for you.
If you want to support us here at Techspin please use our affiliate links if you decide to buy, it’ll help us out here with no extra cost to you. I’m told the Gungnir 100 will be out soon and we can hopefully update the description below with the price when it becomes available.
Overall we really liked this case and features, and if you have a little patience for cable management, it’ll be perfect for your next build and make a subtle yet bold statement. Thanks again to MSI for allowing this exclusive review on their brand new case!

Now I’ll turn this over to you guys to hear your ideas, what do you think of the Neo Blademail, and what features are you looking for in a new case? Leave your thoughts in the comments below. And don’t forget to connect with us online, join us on Twitter, Instagram and Facebook, all at techspinreview.
What case are you using for your current rig? Is there one you’re looking at buying? If you find a good deal on Amazon or Ebay, let me and our viewers know, that’d be great! If this review was informative or gave you some ideas, we’d appreciate you tell us how we could improve for next time! Please take a second to hit Like, subscribe, and the bell to get notified when we put up a new video!
We check the comments, so if you have a question or if we missed something, please tell us down below. And we always like to hear -your- ideas for episodes, so let us know what you’d like to see next. We really appreciate you reading this far, thanks for your time, and we’ll see you on the next. Bye for now!