
We do work with clients to produce content; however, we retain all rights to present accurate observations, testing, and conclusions. Consumers should have all the facts, and we’ll deliver that.
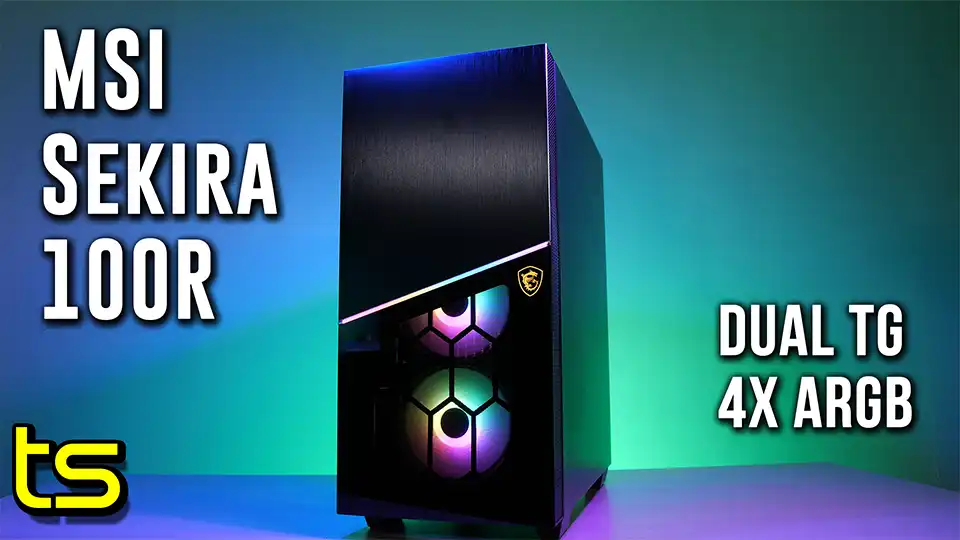
We’ve got the new MSI Sekira 100R case in the studio, this case was sent over to us for review. With a unique top-slide-in panel design, there’s a TG side and also a half-front panel, and it’s a compact mid-tower. At Techspin we bring you honest testing and opinions about new hardware, so you can decide what fits your needs. So let us know in the comments what features matter most to you.
And just a reminder, if you want to know when we drop a new video, follow us on Instagram, Twitter and Facebook all at techspinreview. So how is the MSI Sekira 100R mid-tower? Let’s find out.

Quick Summary- MSI Sekira 100R
A quick summary- the MSI Sekira 100R Case is a good little mid-tower that’s compact, has fast Gen2 Type-C and dual Gen1 Type-A USB, supporting 360 millimeter rads. There’s 4 ARGB fans, which provide decent airflow with triple filters. Don’t expect to fit all the biggest components in, but if you need compact, maybe this one’s for you.
We’re getting this case fresh, so the MSI Sekira 100R retails for $120 USD. The all black case measures 42 centimeters deep by 21.5cm wide and 47.5cm high, and weighs in at 7.9 kilograms. Key features are the tempered glass side and half-front with ARGB fans, and USB Gen2 Type-C.
From sponsored links and as an Amazon Associate, we earn from qualifying purchases. Learn more
Please use our affiliate links for the MSI Sekira 100R case at
AmazonUS: https://amzn.to/3FWNvR7 AmazonUK: https://amzn.to/3YExjvc
AmazonCA: https://amzn.to/3Yx3lt4 AmazonIN: https://amzn.to/3j9t4Yc
The case was tight in the box, we had to open and push it out. Inside it came with the standard screw set and a quick install guide and small manual, and promo card. Getting into the MSI Sekira 100R is unique, as the top cover is removed with two thumbscrews and there’s a magnetic dust filter. It covers the whole top, with mounting holes for both 240 and 280 mil rads, or two more fans here.
MSI Sekira 100R’s glass/metal panels: top-slide design
Both the left glass and right metal panels of the MSI Sekira 100R have a top-slide in design. The 4 mil thick TG panel has metal tabs at the bottom, and it measures 38cm wide by 44.8cm high. Putting back the side glass is really easy thanks to this design.
Four ARGB fans are installed, three in the front, of which one and a bit are visible behind the half height TG panel. The other is mounted at the back, and this compact mid-tower can handle E-ATX, ATX, M-ATX and Mini ITX motherboards, supporting GPUs up to 34 cm in length. Max CPU cooler height is 170 millimeters, and there are rubber grommets on every pass-through.

The 4 centimeter deep case front has a nice brushed aluminum style finish, and has some weight due to the glass. The sides are pretty wide open with enough for structural support, and there’s built-in ARGB that connects with three contacts, and building in a case without a wired front makes things much easier, very good design here. All wired up, the bottom fans are visible, with a matching light bar and ARGB MSI logo middle right. Pretty cool.
Top front I/O panel on the MSI Sekira 100R
Removing the MSI Sekira 100R’s front, there’s a 360 millimeter air filter covering the intake, and it tabs out easily for cleaning, it supports 120/240/360 or wider 140/280 rads. Some cases allow outside fan placement, but with side intake this will impact airflow and cooling a bit. Having the air filter like this isn’t a deal-breaker, but it does take away that option if you need extra space inside, though if you really need the space, you could remove it.
The back of the motherboard tray has one spot for an SSD, the other spot is taken with the ARGB hub that is pre-wired, and will be compatible with other 5 volt 2-space-1 pin ARGB motherboard header and strip lighting.
The top front I/O panel has a nicely finished square power button, a reset button and a single white LED to indicate power. Here’s the USB 3.2 Gen 2 Type-C, along with 2 Gen1 Type-A and HD audio jacks, and an LED control button.

Inside there’s a 18.7cm wide by 14.5 high cutout in the motherboard tray for easy CPU cooler installation, with pre-installed ATX standoffs. Always double check standoff placement on your motherboard to make sure it doesn’t go in a marked off area. The dual hard drive bay shroud can be removed if you want to install a 360 millimeter rad, and the PSU area fits standard ATX supplies, up to a max of 25 centimeters with the hard drive bay removed.
Clearance for the back panel to wiring is 19mm, the side panel adds 4 mils extra for a total of 23mm or 2.3 centimeters, a bit narrow. There’s three cable straps to tie down main cables, and a few more tie down points, and a few more here would still have been appreciated.
All the visible holes have rubber grommets, and wiring up dual ATX 8-pin at the top was fairly standard. The rear panel has the typical I/O cutout with 7 slots, the 120 mil fan has one mounting location, and a solid plate for the PSU area.
The PSU shroud is riveted in, the top has a spot for an SSD and rubber grommets for cable passthrough, and there’s a cutout so you can remember what power supply you chose for your build. The bottom front fan pushes air through this area. On the bottom there’s an air filter for the PSU, and the screw point for the hard drive cage if you want to take it out.

Building in the MSI Sekira 100R case
Building in this case wasn’t too bad, we assembled outside first as we always recommend. This build we’re using the MSI MEG Z490 Ace motherboard, link up here for that review, supporting Intel’s 10th gen CPU lineup with the new LGA-1200 socket. We have an i9-10900K installed, along with 32 gigs of Corsair Vengeance LPX DDR4 at 4600 megahertz.
From sponsored links and as an Amazon Associate, we earn from qualifying purchases. Learn more
Please use our affiliate links for Intel CPUs at
AmazonUS: https://amzn.to/3HJmwK7 AmazonUK: https://amzn.to/3WaMkmP
AmazonCA: https://amzn.to/3V9k6Y0 AmazonIN: https://amzn.to/3j8h0X3
There’s an XPG 8200Pro 256GB NVMe m.2 boot drive for Windows, and cooling is handled by the MSI CoreLiquid 360R. We did a push-pull configuration here, and it just clears the graphics card. By the way, an AIO 360 millimeter water cooler is a good choice for the 10900K, as the Intel 10th gen gets super hot, super fast.
Last step we squeezed in a MSI RTX 2070 Super Gaming X, which is a 29.5 centimeter long GPU, this is all powered by a Aerocool 1000 watt power supply, more than we need, around 700 would be fine. Importantly though, it has dual ATX 8-pin that this board requires. Finishing the build is Silverstone red sleeved cabling for the power connections.
MSI Sekira 100R’s design is unique, ARGB and brushed finish
Overall, we liked the MSI Sekira 100R. The front design is unique and has both ARGB elements as well as a nice brushed-looking finish. Going for $120 USD at time of publication, the case is a little on the pricey side, however with the triple filtered design with ARGB wire-free front panel and options, it’s good for a compact mid-tower. Not having a cable tethering the front dramatically improves the installation experience.
Airflow was decent too, of course a straight through design for front intake always gets the best temps but the very open sides and filter didn’t restrict the air getting through, so no issues here.

MSI Sekira 100R’s top-slide in design: Pros and cons
The top-slide in design… has both advantages and disadvantages. Good, it made putting in the glass side panel very easy, though you have to remove the top for access, it’s an extra step, but it’s easy enough.
The rear panel, however, was really challenging to get on properly, though keep in mind we’re using extensions for power, and those connectors and extra cable length added to everything we needed to fit inside. On other cases we’d press the bottom in and shimmy left and right, closing it in a couple of tries. With the extra cabling though, it took us many more, each time one of the corners not catching at the last moment. So the rear latch system could be improved to make it easier to put on the back with more cabling.
The MSI Sekira 100R case length really factors in the ease of installation, this case height is typical but being 42cm deep, it cuts space for cabling and even component choice as we had a big GPU and radiator to install. Now we were able to get a 360 millimeter radiator into the case, but ended up removing the hard drive cage to do this. The cage can be moved back, but space then becomes an issue for the PSU cabling. If we could move the front fans to the outside, we could leave the cage in, but we’d have to ditch the front filter.
Also with a 360 millimeter rad you may have to decide if you want RGB visible on the outside, or just on the inside. Doing a push-pull with all three fans isn’t possible as the PSU cover blocks the lowest fan. Instead we did three fans push, two inside for pull, and the MSI RTX 2070 Super Gaming X at 29.5 cm clears by a few millimeters. If you’re just doing a pull OR push, the max length will be 32cm, but you sacrifice RGB either exterior or interior. Our other MSI RTX 2070 Super Gaming X Trio at 32.5cm won’t fit with a rad here.

Ideally for this case you want a 240 mil AIO or air cooler. A 240 can fit up at the top, and you get the front RGB fans showing both outside and inside. Though with the 360, if we swapped out the hidden top RGB fan for a normal one, and put that and the spare up top? Let us know what you’d do in the comments. Also, considering the compact nature of the case, a surrounding plate for PSU mounting to allow it to slide in from the back is sorely missed here, and would really help when doing modular cabling.
Anyways, if you favor a more stylized and subtle implementation of RGB, the MSI Sekira 100R is a good choice. If you pick one up, shopping through our affiliate links will help us here with no extra cost to you. And follow us on Twitter, Instagram and Facebook at techspinreview. Thanks go to MSI for sending over everything for this review.
What key points are you considering when shopping for a new case? We want to hear your thoughts and questions, down in the comments. We depend on your support, so please take a second to hit Like, subscribe, the bell, and we often reply to your feedback so if you have a question, fire away. We really appreciate you watching this far, thanks for your time, and we’ll see you on the next. Bye for now.
See more MSI products, PC case, and Monitor reviews