
We do work with clients to produce content; however, we retain all rights to present accurate observations, testing, and conclusions. Consumers should have all the facts, and we’ll deliver that.
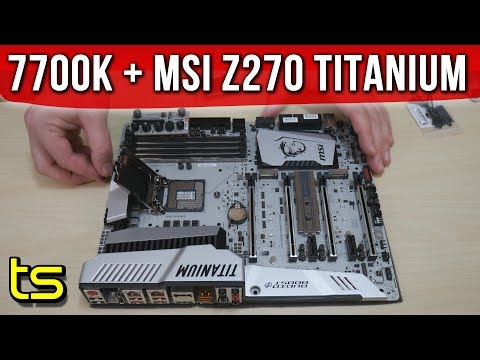
Alright, here’s my new pride and joy, boy, does she look purrrdy! Today we’re doing a Intel i7 7700K Build. It’s the MSI z270 XPower Titanium motherboard, made for the new Intel i7 7700K Kaby Lake CPUs, with an amazing silver PCB coating, heatsinks and piping for the inductors and power stages, a I/O jack and audio component cover with a LED light channel, onboard Mystic Light RGB onboard controller, the power, reset and overclocking controls bottom right.
The Intel i7 7700K CPU is a great buy
Top left you can see both the supplemental 8-pin EPS connector as well as another 4-pin EPS for overclocking your Intel i7 7700K CPU. I was very lucky that my newer PSU had not just one but two EPS power cables. You can’t use 8-pin PCI cables in an EPS connector, so without a newer PSU ocable r a 4-pin Molex to 8-pin EPS adapter you might be out of luck. I’m also not sure I would trust the Molex power rail to supply the voltage.
Here we see the Steel Armor reinforced PCI slots, three M.2 slots, one with a shield, and a supplementary 6-pin PCI power connection. This board, it’s eating up all my modular cabling!
From sponsored links and as an Amazon Associate, we earn from qualifying purchases. Learn more
Please use our affiliate links for AMD CPUs at
AmazonUS: https://amzn.to/3HIVSRp AmazonUK: https://amzn.to/3WvTP7k
AmazonCA: https://amzn.to/3HLVEJd AmazonIN: https://amzn.to/3hyVLgP
There’s 2 SATA three ports by the 24-pin ATX connector, 6 SATA three on the side and a U-dot-2 connector. The dual-channel memory slots all have Metal Armor reinforcement, the OC Dashboard plugs right into the small port in-between, leaving the 9 pin voltage check module available. It comes with a 27 centimeter extension cable, too.
Motherboard silver PCB treatment, printed graphics
The MSI Z270 XPower Gaming Titanium is a flagship motherboard to pair with the Intel i7 7700K, and has lots of standard accessories and additional goodies inside. You have the driver installation CD, good, and inside this bag comes a USB 2.0 expander module with Velcro on the back.
You can use one board port to give you 4 more USB 2.0 ports if you power it with a 4-pin Molex. It comes with both the connecting cable, as well as the other half of the Velcro strip. Next is a sheet of SATA cable labels, and a thank you please register reminder. We have a quite useful Quick Install guide, a color poster and board map, and the thick User guide.
Next there’s these really cool silver transparent SATA cables, just wow. 3 packs times 2 cables is 6 total, 3 of those have a single L-shaped connector end while all the rest are straight. MSI has graphic printed the I/O shield and it looks very nice. Here we see the Mystic Light connecting cable, it runs off the single motherboard header and splits into two ends to run compatible RGB lighting.
This is the extension cable for the OC Dashboard I mentioned earlier. And an MSI branded SLI bridge ribbon cable. Last we have modular mounting accessories, a metallic case badge, and the Voltage Check Point cable bag with instructions. A bit weird, there’s 9 points on the board but only 6 cables.
The new Kaby Lake comes in 2 Core-i7 variants- I opted for the fastest one, the Intel i7 7700K which was 11 thousand 5 hundred NT or about 370 us dollars, and I’m glad I chose this over the x99 board i7-6850K I was considering at nearly double the cost.
From sponsored links and as an Amazon Associate, we earn from qualifying purchases. Learn more
Please use our affiliate links for Intel CPUs at
AmazonUS: https://amzn.to/3HJmwK7 AmazonUK: https://amzn.to/3WaMkmP
AmazonCA: https://amzn.to/3V9k6Y0 AmazonIN: https://amzn.to/3j8h0X3
Installing the Intel i7 7700K CPU
Here I’m installing the Intel i7 7700K CPU. First I lift the lever to make the 11-56 socket open and take the CPU carefully out of the packaging. The board’s on the foam padding it shipped with, if you’re wondering. I check the two notches at the top of the CPU so they match and lay the CPU in the socket carefully to not bend any pins. I always take out the top piece manually but decided to trust instructions this time and lower the lever in… and it pops right out. Cool.
So I’ve had stuff on order for this build from Amazon since January 9th, still waiting for it to be shipped. I bought 2 packs of the Corsair Vengeance LPX 32GB DDR4 32 hundred in white, but in order to get this review out, I’m putting in a stick of Kingston Hyper X 8 gigabyte DDR4 twenty-four hundred memory in the meantime. From the Intel i7 7700K CPU socket out, memory slots are Channel A1, A2, B1 and B2. On page 29 of the manual it says for one stick it should actually be one slot up in A2, whoops.. Now I know.
Here’s the cool M2 Shield which swings up and has thermal paste on the underside. It also comes right off, lucky too, cause it’s a fingerprint magnet. Curious why they didn’t give you at least two, weird. Either cool off a raid, or fill empty spots. Anyways I wanna show off my Samsung 960 Evo in my build, so I’m going to switch screws and secure it down in place. Still lifts a bit, but no big deal.
To put in the 960 Evo, you insert it at a 30 degree angle, then push it down. Finally, you screw it in place, and it’s installed! I installed a Cooler Master Hyper 212X to test, and the backplate fits on easily. Next comes thermal paste. Lots of theories abound on the internet as to how much you need, using a dot, x-pattern or coat. I tend to use a lot, but at least it’s covered and it transfers heat well. Then the 212 sits down on top of that, and I first get each screw to thread into the bolt, before tightening down in an alternating pattern.

Intel i7 7700K: a good performer
I usually do this last step after the motherboard’s been installed in a case, so I’m careful and pick it up by the heavy heatsink. Always turn or move your case slowly if you have a big heatsink or heavy graphics card, you don’t want to stress the components and damage can and does happen. If you need to move your PC in a vehicle, always lay it motherboard flat- my friend snapped off his PCI slot with a large GPU in a vertical position. Alternatively, remove the card and reinstall after moving the PC.
Compared to an SSD, I saw how fast Windows 10 boots from an NVMe drive, so let’s go to that footage now. My other case is open and running nearby, sorry hehe. Okay, next step is to drop it into a sweet case, and I have just the one. If you pick one up, shopping through our affiliate links will help us here with no extra cost to you. And follow us on Twitter, Instagram and Facebook at techspinreview.
Please take a second to hit Like, subscribe, the bell, and we often reply to your feedback so if you have a question, fire away. We really appreciate you watching this far, thanks for your time, and we’ll see you on the next. Bye for now.